Create and Manage Lists in Boundless
Create and manage custom lists for your patrons on Boundless! To access this area, go to Settings and then click on List Management.

Any existing lists that you previously created will display on the main List Management page. Any previously created lists that you disabled will be hidden automatically. You can show those by turning off Hide Disabled Lists.
Search and Sort Your Lists

Search for lists by name by entering all or part of a list name in the List Search field, and then press enter or click on the magnifying glass icon.
Filter your lists to only show lists that are Criteria-Based, Title-Based, or lists that you have Shared with other libraries.
To clear any of your filters, click on the Clear icon.
Create a Criteria-Based List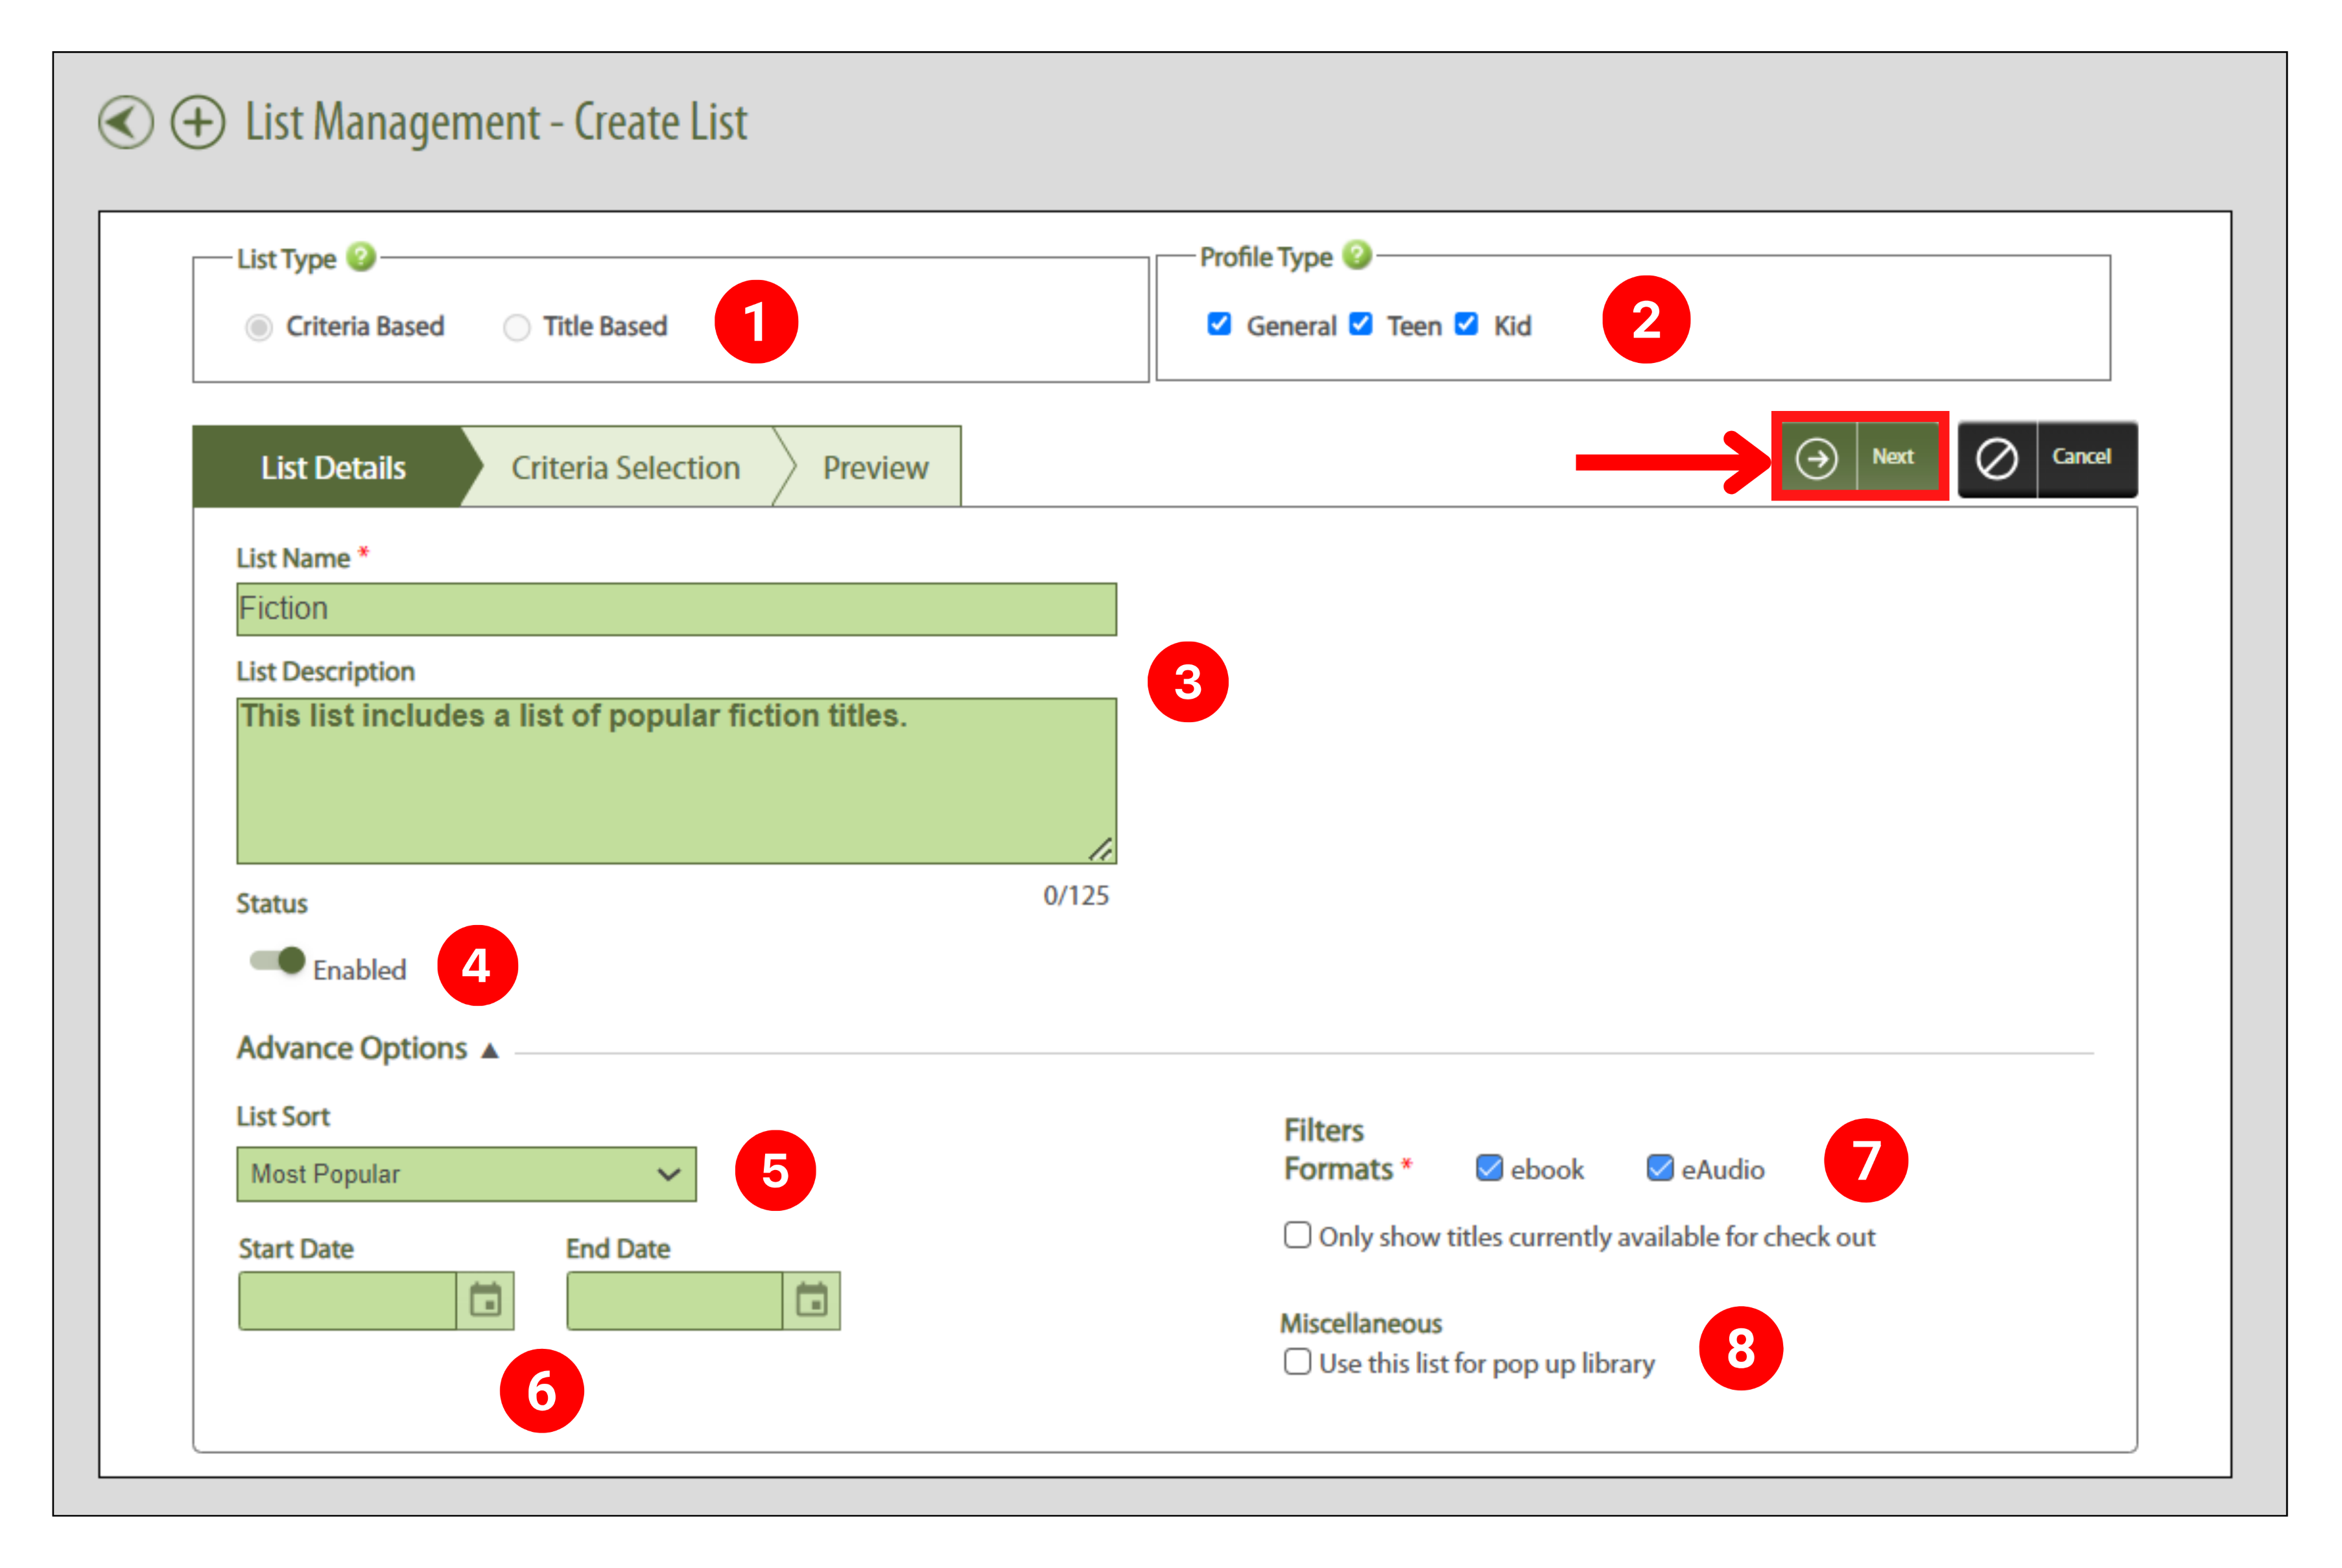

Create a Title-Based List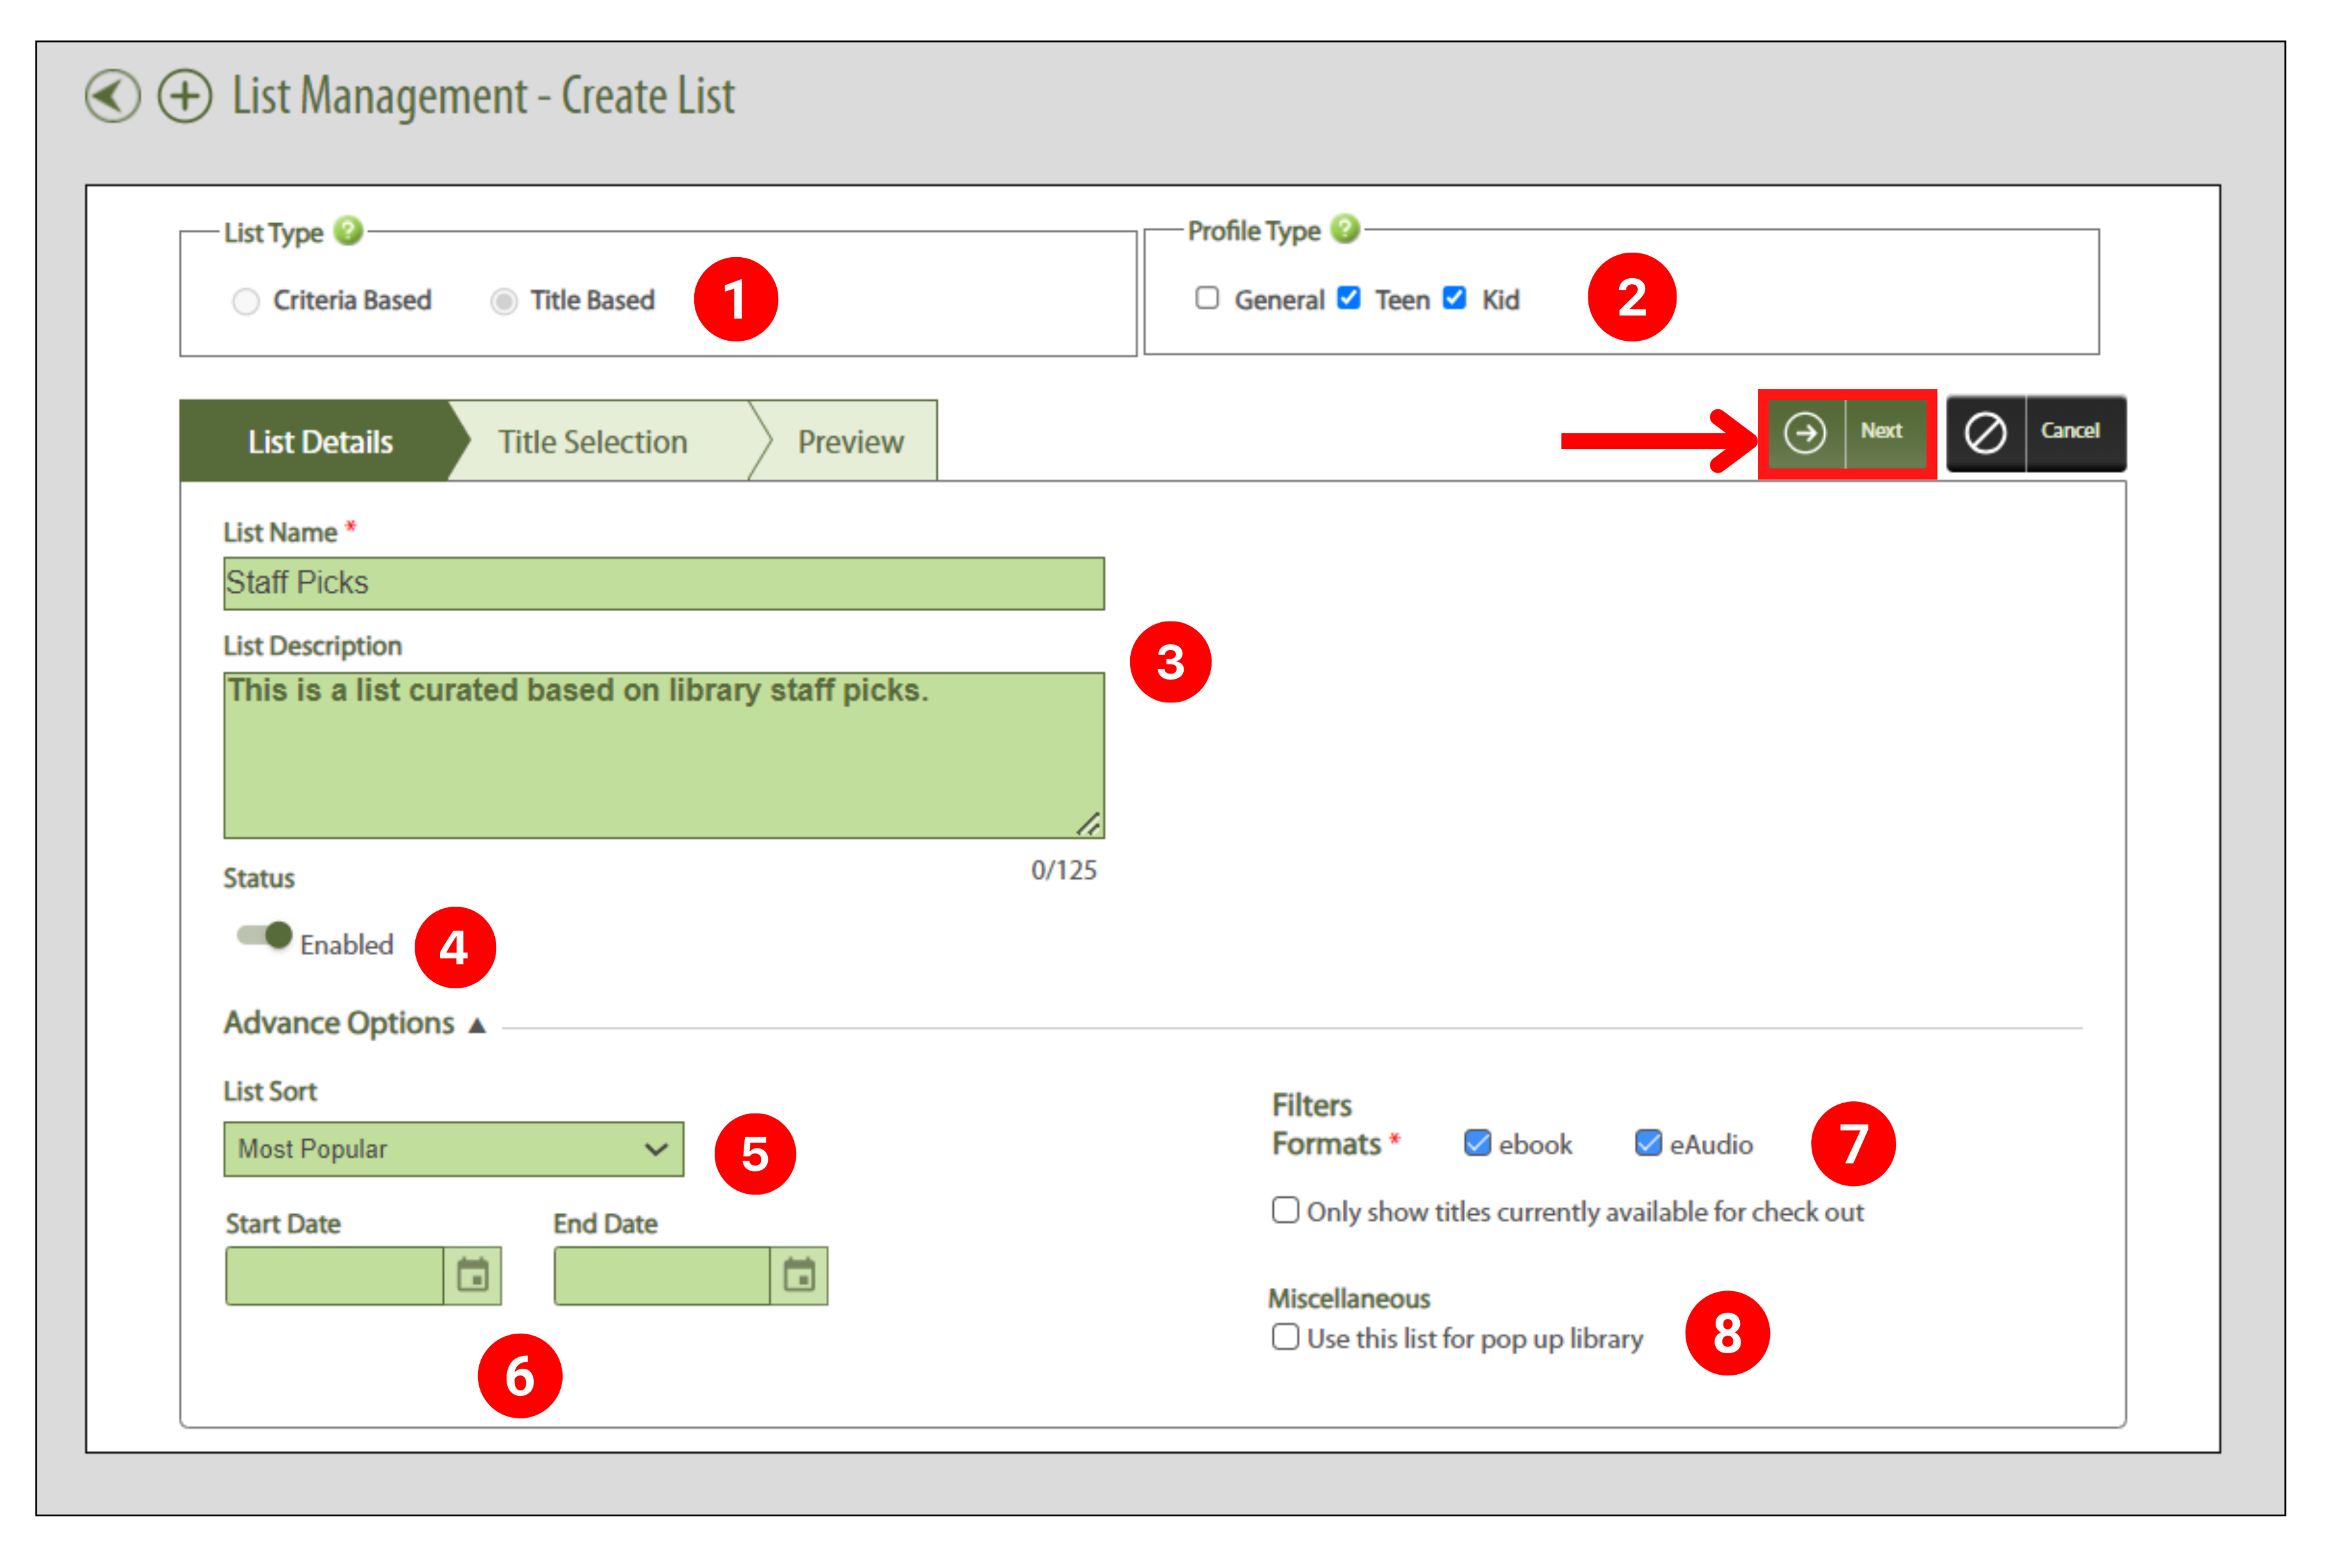


Note: If you have a list of ISBNs, you can upload them to your title-based lists, saving you time.
Add a List to Pop Up Library
To add an already created list to your Pop Up Library devices, just click on the Pop Up Library icon next to the list you want to add to your devices.

If you already have a list assigned to your Pop Up Library devices, you will get a message stating that the new list will overwrite any currently assigned list you may have for your Pop Up Library devices. Click Yes to continue.
Once you click yes, the Pop Up Library icon next to your list will display in bold, signifying that it has been added to your Pop Up Library devices.

Reorder Your Lists
To change the order in which your lists display to your patrons, simply grab the colored handle on the left side of the screen and drag-and-drop a list to your desired location. When you release your mouse, the list will be automatically saved in its current position.

Please note that you can also reorder your lists from within the Library Administration tile.
Editing an Existing List
To edit an existing list, just click on the pencil icon next to the list you want to alter. The list will open, and you can follow the steps above to make changes.
Please note that you can edit your lists from within the Library Administration tile.
Deleting an Existing List
To delete an existing list, click on the X icon next to the list you want to delete within List Management. You’ll get a message asking you if you are sure you want to delete the list. If so, just confirm the deletion to delete the list. It will be removed from your Boundless sites shortly.
Community Share and Consortia
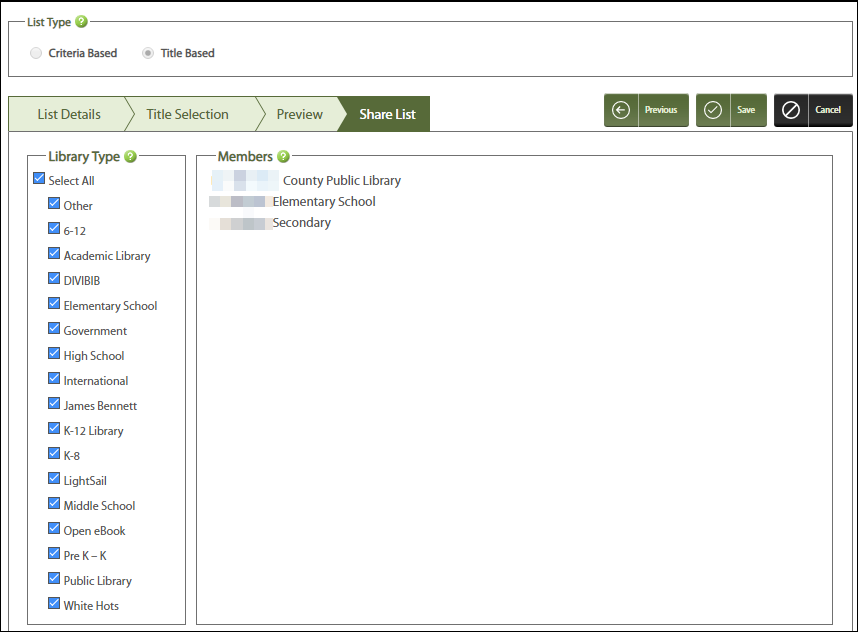
If you have Community Share and/or are a Consortia Library, you will have access to a fourth tab, called Share Lists. This tab will let you share the associated list with one of your member libraries or organizations. Simply select the Library Type you wish to share with on the left side of the screen. The members associated with that library type will then display under the Members heading. The list will be shared with any library under that heading.
Any existing lists that you previously created will display on the main List Management page. Any previously created lists that you disabled will be hidden automatically. You can show those by turning off Hide Disabled Lists.
- Criteria-based lists are created using broad criteria, such as entire subjects and audience levels. These lists display on the left side of the screen in green.
- Title-based lists are created using very limited criteria at the individual title level. These lists display on the left side of the screen in blue.
Search and Sort Your Lists
Search for lists by name by entering all or part of a list name in the List Search field, and then press enter or click on the magnifying glass icon.
Filter your lists to only show lists that are Criteria-Based, Title-Based, or lists that you have Shared with other libraries.
To clear any of your filters, click on the Clear icon.
Create a Criteria-Based List
- Click Create New List on the main List Management page.
- On the Create List page, complete the following steps:
- (1) – Select Criteria Based.
- (2) – Select Profile Type(s). Your lists will automatically appear within the Library Admin tab under the associated profile type. Customize Your Library Page Through Library Admin Management
- (3) – Enter a List Name and List Description in the associated fields. The List Name will display on your Boundless site, whereas the List Description is for your internal use only. The list description will display to the left of your Featured List if you enable that feature in the Boundless Library Administration tile.
- (4) – If you want to publish this list immediately, select Enabled for the Status. Select Disabled to work on your list without publishing it once you are done. Please note that You can easily enable and disable this list once it’s saved using the Library Administration tile.
- (5) – Choose how you would like to sort your list in the List Sort field: Just Added, Publication Date, Most Popular, Recently Returned, Title, or Author.
- (6) – If you would like your list to be time-sensitive, select a Start Date and/or an End Date from the associated date pickers. The list will only display during the dates you select once you have enabled it.
- (7) – Select the type of titles you wish to include on your list: eBooks and/or Audiobooks. Select Only show titles currently available for checkout to ensure that only titles that do not have any holds on them display within your list.
- (8) – Select Available for my library page to display this list on your Boundless website’s home page. This option will be selected by default. If you have Pop Up Library, you can select Use this list for Pop Up Library to display the list on your Pop Up Library devices. If you select this option, you will receive a warning message to let you know that this list will overwrite any previously selected lists you have assigned to your Pop Up Library devices.
- Once you are finished completing fields on the List Details tab, click Next.
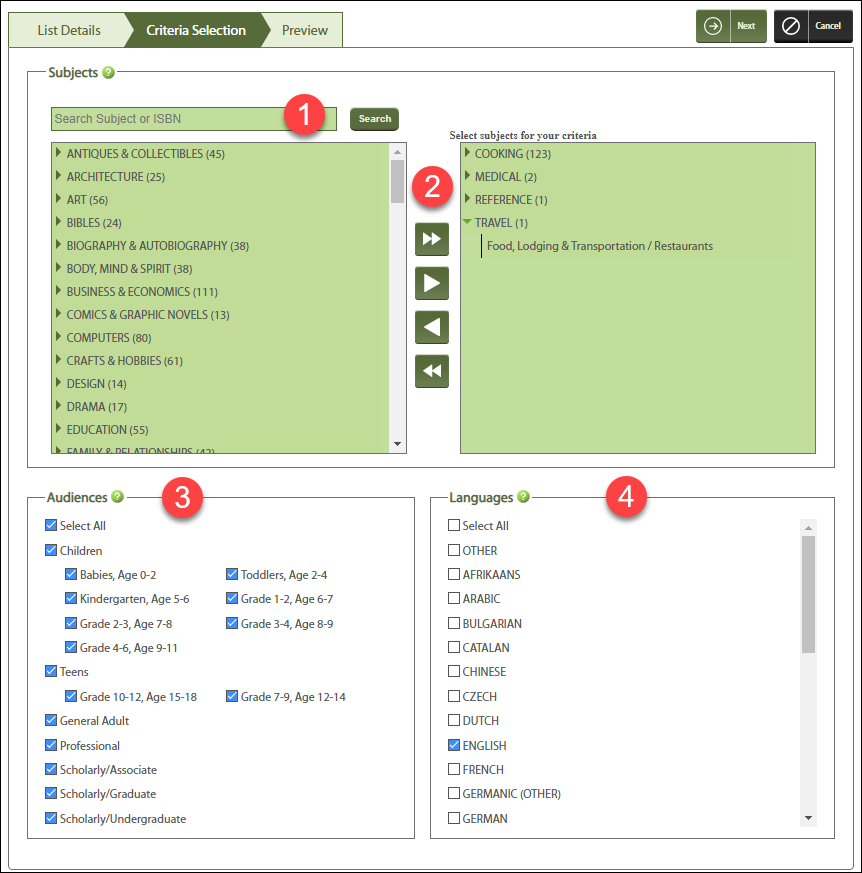
- The Criteria Selection tab displays. This is where you will choose the subjects, audiences, and languages you wish to associate with your list. Complete the following steps:
-
- (1) – Search for a specific subject or ISBN in the Search field to include in your list, or select from the list of subjects provided. To select a subcategory within a subject, click on the arrow next to the subject name to expand it.
- (2) – Use the arrows to move subjects in and out of the selected subject box on the right side of the screen. Any subjects you leave on the right side of the screen will be included in the associated list.
-
-
Use this arrow to move all subjects into the selected subjects box on the right side of the screen. This can be useful when you want to include most subjects, as it allows you to simply remove the ones you do not want to use, instead of adding each subject manually.
Use this arrow to move a single subject into the selected subjects box on the right side of the screen. You can add main subject headings or subcategories found within the main subject headings.
Use this arrow to move a single subject out of the selected subjects box on the right side of the screen. When you remove a subject from this area, it will not be included in the associated list.
Use this arrow to move all subjects out of the selected subjects box on the right side of the screen.
- (3) – Select the audience levels you wish to include in your list within the Audiences area. The audience options that display will be based on your profile type selection. Only titles that match those audience levels will be included in this list.
- (4) – Select the Languages you wish to include in your list within the associated section. Only titles that have the selected languages will be included in this list.
-
- When you are done making selections on this tab, click Next.
- The Preview tab displays all titles that match your selected criteria. If you have limited yourself too much and either have no titles that match your criteria, or too few, click Previous to go back to the Criteria Selection tab to select more titles. Click Save to complete your list.
- If you selected Enabled on the List Details tab, you’ll get a message stating that your newly created list will display on your Boundless site in 15 minutes. If you did not enable your list, you can come back later to complete it.
Create a Title-Based List
- Click Create New List on the main List Management page.
- On the Create List page, complete the following steps:
- (1) – Select Title-Based.
- (2) – Select Profile Type(s). Your lists will automatically appear within the Library Admin tab under the associated profile type. Customize Your Library Page Through Library Admin Management
- (3) – Enter a List Name and List Description in the associated fields. The List Name will display on your Boundless site, whereas the List Description is for your internal use only.
- (4) – If you want to publish this list immediately, select Enabled for the Status. Select Disabled to work on your list without publishing it once you are done. Please note that You can easily enable and disable this list once it’s saved using the Library Administration tile.
- (5) – Choose how you would like to sort your list in the List Sort field: Just Added, Publication Date, Most Popular, Recently Returned, Title, or Author.
- (6) – If you would like your list to be time-sensitive, select a Start Date and/or an End Date from the associated date pickers. The list will only display during the dates you select once you have enabled it.
- (7) – Select the type of titles you wish to include on your list: eBooks and/or Audiobooks. Select Only show titles currently available for checkout to ensure that only titles that do not have any holds on them display within your list.
- (8) – Select Available for my library page to display this list on your Boundless website’s home page. This option will be selected by default. If you have Pop Up Library, you can select Use this list for Pop Up Library to display the list on your Pop Up Library devices. If you select this option, you will receive a warning message to let you know that this list will overwrite any previously selected lists you have assigned to your Pop Up Library devices.
- Once you are finished completing fields on the List Details tab, click Next.
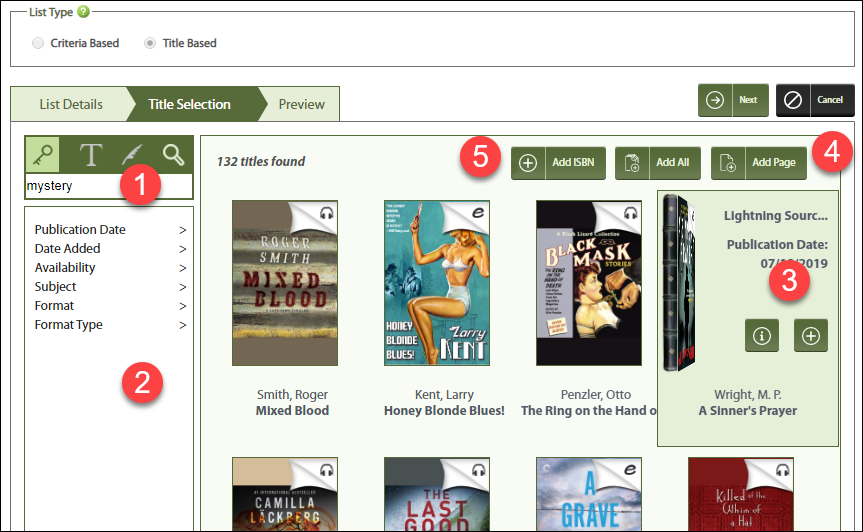
- The Title Selection tab displays. This is where you will choose the individual titles you wish to associate with your list. Complete the following steps:
-
- (1) – Search for your title in the Search field. You can search by Keyword, Title, or Author.
- (2) – To narrow down your search results, select a filter from under the search term you just entered.
- (3) – Any titles that match your search criteria display on the right side of the screen. Hover over a title to reveal several selection options. To learn more about a title, click on the View Title Details icon. To add the title to your list, click on the Add Title icon.
- (4) – If you want to add all titles on the current page to your list, click Add Page. To add all titles found in your search, click Add All.
- (5) - To upload up to 500 ISBNs, click Add ISBN. Enter or paste your ISBNs on the left side of the pop-up, and then click Add to List. Your ISBNs will be uploaded automatically to your list.
You'll receive a success message. If any of the ISBNs are rejected, a list of the rejected ISBNs will display under the Rejected ISBN column.
- If you select a title for your list, and then change your mind, simply hover over the title, and then click on the red delete icon to remove it from the list.
Note: If you have a list of ISBNs, you can upload them to your title-based lists, saving you time.
- When you are done making selections on this tab, click Next.
- The Preview tab displays all titles that match your selected criteria. If you want to make any changes, click Previous to go back to the Criteria Selection tab to select more titles. Click Save to complete your list.
Add a List to Pop Up Library
To add an already created list to your Pop Up Library devices, just click on the Pop Up Library icon next to the list you want to add to your devices.
If you already have a list assigned to your Pop Up Library devices, you will get a message stating that the new list will overwrite any currently assigned list you may have for your Pop Up Library devices. Click Yes to continue.
Once you click yes, the Pop Up Library icon next to your list will display in bold, signifying that it has been added to your Pop Up Library devices.
Reorder Your Lists
To change the order in which your lists display to your patrons, simply grab the colored handle on the left side of the screen and drag-and-drop a list to your desired location. When you release your mouse, the list will be automatically saved in its current position.
Please note that you can also reorder your lists from within the Library Administration tile.
Editing an Existing List
To edit an existing list, just click on the pencil icon next to the list you want to alter. The list will open, and you can follow the steps above to make changes.
Please note that you can edit your lists from within the Library Administration tile.
Deleting an Existing List
To delete an existing list, click on the X icon next to the list you want to delete within List Management. You’ll get a message asking you if you are sure you want to delete the list. If so, just confirm the deletion to delete the list. It will be removed from your Boundless sites shortly.
Community Share and Consortia
If you have Community Share and/or are a Consortia Library, you will have access to a fourth tab, called Share Lists. This tab will let you share the associated list with one of your member libraries or organizations. Simply select the Library Type you wish to share with on the left side of the screen. The members associated with that library type will then display under the Members heading. The list will be shared with any library under that heading.
